Making Of Uta
Most of my Uta’s References came from watching One Piece Red the movie and a Japanese Magazine where they had only one page with her artwork. Basically there wasn’t enough references for the cosplay itself because I started working on it right after the movie came out in the US so I had to come up with my own plans for it.


Materials used
·Fleece as main fabric of the hoodie
·Sunline anti static and silk as lining fabric
·Bias binding tape of various colors for cuff and waistband -80 yards
·Knit Fabric for white under dress
·Mesh fabric for wig
·Insulating fabrics
·poly fill
·Large zipper, one inch rope for pocket piping
·Cutaway stabilizer in black for embroidery
·Embroidery threads 9,150 yards
·Felt & velvet
·Medium to heavy weight interfacing
·Heat & bond Basting adhesive both spray and sticker form to keep everything in place for stitching
·Four ways stretch spandex in white and red
·Non-slip shoe pads
·Foam clay
·Regular worbla
·Magnetic snaps for shoes
·Eva foams 2mm, 4mm, 7mm
·Plastazote foam 5mm
·LED strips
·AAAx2 battery case
·9V battery holder
·Flexbond
·Plasti Dip
·Barge cement
·Got 2b glued hair spray
·Tacky glue, aluminum foil and wire for wig styling
Self Made Patterns
There is no commercially bought pattern that was used in this entire cosplay. The jacket pattern was bought, but it has been modified so much to the point that it’s a completely different pattern now.
This costume is the result of 6 months of research & experimentation using different materials & techniques.


Puffy Hoodie
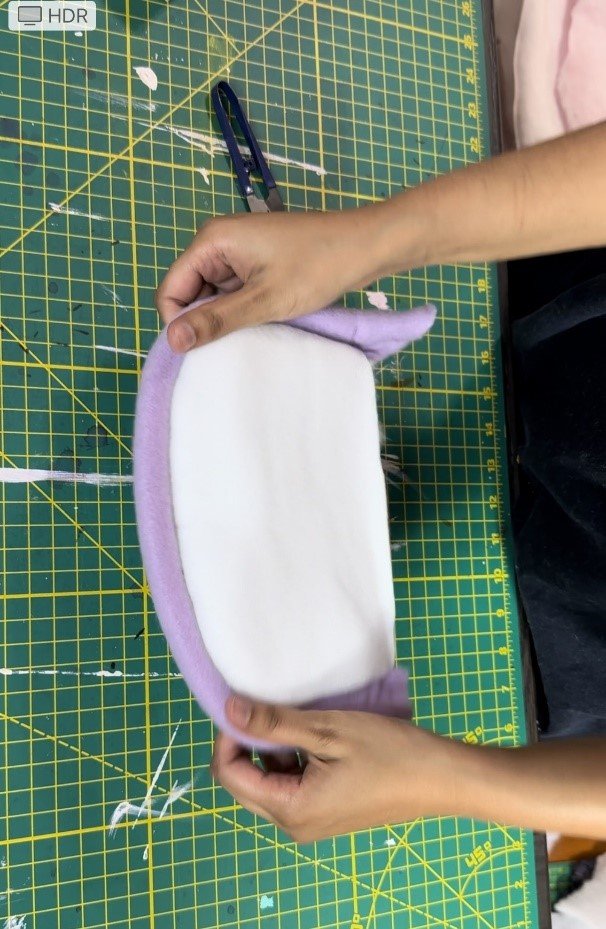
For the jacket I modified a pattern from Grasser because that was the closest, I could find to Uta’s hoodie. I made a mock-up so I could use it to modify the pattern as needed. Then I made the pattern for the sleeves. I cut out fleece & insulation and stitched them together,hand-stitched violet fleece piping, which I made, pinned them into the sleeves so they don’t move during machine stitching and then satin-stitched on top of the seams at 6mm stitch length to outline the jacket.
White, yellow, & pink bias binding were stitched together for cuffs & the waist band, I pressed the whole thing down with medium to heavyweight interfacing and satin stitched them In 4.5 mm stitch length. Then I added insulating fabric with basting spray adhesive.
for the pocket I used 1 inch cotton rope, I made a piping with it by wraping it with purple fleece and then stitched it around the pocket.
I used a large zipper for the front closure. which I later dyed purple using Rit synthetic to match the costume.
After attaching the pockets and cuffs to the jacket I cut the lining out of sunline anti-static lining fabric and stitched it to the jacket. Then I took out a bunch of polyfill from an old pillow and used it to puff up the jacket.


Hood
For the hood, I traced an old, big lamp I found at the thrift store because it was the closest I could find that represented the shape of her hoodie pattern.I used 4mm eva foam and worbla to create the dome shap, covered it with insulating fabric. And attached the ears.
I made the piping in front of the hood using white & purple bias tapes and insulating fabri, embroidered the nose, ears and eyes, pinned them in place, and stitched them to the hood cover. Lining of the hood cover had to be base stitched and glued with the foam & insulation to keep it in place. at the end I hand-stitch the jacket and the hood together.
I attached a hook at closure to wear the jacket like a cape.


Embroidery Patches making
I free hand embroidered all the patches using my regular sewing machine including 3d embroidering all the outlines using 2 mm eva foam. For this I had to experiment with different kinds of stabilizer such as tearaway, wash away, iron on and cut away stabilizer because I needed to embroider everything without using a hoop. at the end I succeeded by using 5 layers of cut away stabilizer basting together with heat and bond lite spray and 2 mm eva foam on top of it. Best thing about 3d embroidering the outlines using Eva foam is that design stays exactly the same even without a hoop.I resized all the embroidery patterns in Adobe Illustrator.for some of the small patches I 3D embroidered 2mm eva foam on top of felt.After basting the inner parts & tearing away the foam I finished the patch with 4.5mm satin stitch.
For the big Patch I created the canvas for embroidery by basting 5 layers of cut-away stabilizer together with spray adhesive and mesh fabric on top. 3D embroidering the outlines using 2mm eva foam & embroidered with black threads. After the emnroidery was done i tore away the leftover eva foam.
Free-hand embroidering using darning foot on top of each color. Then I cut out the entire patch from stabilizer using scissors & a precision knife. UTA text on the patch is made with velvet and satin stitched.
Background of the 18”x15” patch is made with navy blue velvet and felt.
I had to hand embroider the outlines in the hood and pockets later, because it didn’t fit under the sewing machinefor satin stitching.


White dress
I made the top layer using knit fabric & lining with white satin. Added ruffles for the sleeve & collar. then I cut out the sleeve from knit white fabric & dyed them using Rit Synthetic, Serged & stitched it to the main dress.I stitched the patch onto the sleeve. Made the bow & buttons using black velvet and stitched them to the dress.


Boots
Made the boot covers using white four-way stretch spandex, Serged the edges and added the zipper, I added insulating fabric in the padding to go around the boot covers, serged them as well. clipped the paddings to the boots. Then I traced the patterns for the embellishment. I used insulating fabrics for all the embellishments to make them pop out then made the circles for the front using foam clay, primed and painted them using plasti dip and yellow acrylic. I made the round part using christmas ornaments wrapped in red spandex. stitched worbla to the back of each ornaments fir then to stick to the shoes.


Heabphones
I 3D modeled the headphone cups using Fusion 360 and then 3D printed them. the base of the headphones are made with worbla.After successfully printing and sanding the 3D prints, I started working on the wiring and lighting. I soldered red and black wires to the LED strips and then covered the wire with shrinkwrap tubing. The lights were connected and powered using a 9V battery and two AAA batteries. A toggle switch was connected to act allow the lights to be turned on or off. I made holes in the head piece for the wires to be inserted and connected with each other. attached the lights to the headphones. airbrushed the plastizote cutouts to have a seamless effect after the lights were put on, then I glued them using hot glue. I attached snaps to PVC plastic and screwed them on top to keep the head piece on my head, inserted the removable batteries into the cups, I attached the loop side of an adhesive Velcro to the inside for comfort and used satin to cover the batteries.


wig
I cut a 125 cm white wig in half and dyed one half in Rit Synthetic red dye twice to bring to the desired color.Stitched it together with the undyed half using a zig-zag stitch.then teased and steamed the wig. The hair loops are made with aluminum foil and wire wrapped in foam clay as a base. Then I wrapped wig fibers around each of the loops with tacky glue and dried them using a hair dryer. I used transparent screws to close the two bigger loops. I used worbla as a wig base and made two holes for the screws to go through. The loops were attached using plastic transparent screws, so they stay on the wig and also can be removed if needed. Then I wrapped the long pony tails using tulle mesh in red and white so that the hair wouldn’t get caught up to my zipper. Cut the hair at the bottom and locked them using tacky glue. I made a clip in bangs out of my old wig to add some extra volume to the front of her hair. I also added her signature curl on top of the bangs crafted out of wire, aluminum foil, foam clay and wig fiber.


Bangles The making
I traced the handmade pattern on worbla, primed and then painted it with blue acrylic.


Mask making
I drew the pattern after watching an online tutorial on how to make N95 mask.modified it to the shape of my face. Then I stitched two colored fabrics together and cut them into 3 layers. and stitched the layers together.


